
UPPSC Photo and Signature Resizer, Converter and Compressor
Using this free online UPPSC Photo and Signature Resizer, Converter and Compressor you can resize, crop, convert, and compress your photo and signature to the UPPSC requirement in seconds. The exam and its official size presets are already loaded, so you pick a preset, upload your image, and download a file with the right size, the right format, and a file weight under the official maximum.
The tool works in six steps: Exam, Type, Upload, Crop, Caption, and Download. Before you download, a comparison table shows your original image next to the UPPSC requirement and the processed output, so you can confirm every value instead of guessing. You also get zoom, rotate, flip, a face mask guide, an optional name and date caption, a file name helper where the exam defines one, and free width, height, unit, format, and file size fields when your notification quotes a different value.
Use UPPSC Photo and Signature Resizer, Converter and Compressor
Exam Photo & Document Tool
Drag & drop your image
JPG, PNG, WebP supported
Read Content
What is UPPSC Photo and Signature Resizer, Converter and Compressor?
UPPSC Photo and Signature Resizer, Converter and Compressor is a free browser tool that prepares your photograph, your signature for a UPPSC application in the size, format, and file weight the notification asks for. Nothing is installed, no account is needed, and the exam specification is already loaded, so a rejected file is never about a guessed size again.
The workflow runs in six steps: Exam, Type, Upload, Crop, Caption, and Download. After processing you get a before and after comparison, a three column specification table, an overall pass or fail summary, and the download button.
UPPSC photo and signature requirements used by this tool
These are the size presets stored for UPPSC. They come from the exam specification database and are applied exactly as listed, so nothing is rounded, converted, or quietly changed.
| Item | Size preset | Format | File size | DPI | File name rule |
|---|---|---|---|---|---|
| Photo | UPPSC Photo (5x6cm) 5 x 6 cm |
JPEG | 500 KB max, 50 KB min | 96 DPI | As per the official notification |
| Photo | UPPSC Photo (3.5x4.5cm - 200 DPI) 3.5 x 4.5 cm |
JPEG | 500 KB max, 50 KB min | 200 DPI | As per the official notification |
| Photo | UPPSC Photo & Signature Combined (3.5x6cm - 200 DPI) [After merge/combination] 3.5 x 6 cm |
JPEG | 500 KB max, 50 KB min | 200 DPI | As per the official notification |
| Signature | UPPSC Signature (6x3cm) 6 x 3 cm |
JPEG | 500 KB max, 50 KB min | 96 DPI | As per the official notification |
| Signature | UPPSC Signature (6x3cm - 200DPI, 300-500px) 6 x 3 cm |
JPEG | 500 KB max, 50 KB min | 200 DPI | As per the official notification |
| Signature | UPPSC Signature (3.5x1.5cm - 200 DPI) 3.5 x 1.5 cm |
JPEG | 500 KB max, 50 KB min | 200 DPI | As per the official notification |
What can this UPPSC photo and signature tool do?
- Six-step guided workflow: Exam, Type, Upload, Crop, Caption, and Download. Each step shows only what you need next.
- Exam already preselected: UPPSC loads with its own presets, so you do not scroll through a list of 152 exams to find yours.
- Preset coverage: 3 photo presets, 3 signature presets.
- Crop tools: zoom, rotate, flip, drag inside the frame, and a face mask guide so the head lands in the right proportion.
- Exact resize with unit support: pixel, centimetre, and inch presets, so a 3.5 x 4.5 cm photo and a 200 x 230 px photo are both one click away.
- Format conversion: output in the format the exam asks for, with the extension normalised so the portal accepts the file.
- Smart compression: the file is compressed until it fits the maximum file size, and the optional minimum size is used when a notification states a lower bound.
- Before and after comparison: your original dimensions, file size, and format are shown next to the produced output.
- Three column specification check: a table lists your image, the UPPSC requirement, and the output result, closed by an overall pass or fail summary.
- File name helper: when the exam defines a file name pattern, the tool builds the name from your first and last name and shows a live preview you can copy.
- Caption step: add a name or date of birth on the photo when your notification requires a stamp, and keep the step empty when it does not.
- Manual override fields: width, height, unit, format, maximum output size, and an optional minimum size, for notifications that quote a value not yet listed.
- Works on every device: Windows, Mac, Linux, Android, and iOS, in the browser, with nothing to install.
How to use UPPSC Photo and Signature Resizer, Converter and Compressor step by step
- Open the tool and check the exam shown in the first step, UPPSC. If your notification names a different or newer exam, search for it in the exam search box.
- Click Continue and choose what you are submitting: Photo, Signature.
- Pick the size preset that matches your notification. When several options exist, choose the one named for your exam rather than a generic one.
- If your value is not listed, type your own Width, Height, Unit, Format, Maximum output size, and optional Minimum size.
- Upload your photo or signature. A clear, front-facing original gives a far better result than an old or heavily filtered scan.
- In the crop step, zoom, rotate, or flip if needed, drag the image until the face or the signature sits correctly, and switch on the face mask guide when it helps.
- Use the caption step only if your own notification asks for a printed name or date.
- Check the comparison table and the overall pass or fail summary. Fix the image if any row is marked as not matching.
- Download the processed image and upload it in your application. If the exam defines a file name pattern, copy the suggested name.
How to get an accepted photo the first time
- Use a recent colour photograph taken within the last few months. Old group photos and screenshots are the most common rejection reason.
- Face the camera straight on, keep both eyes open, and keep the whole face inside the frame with some space above the head.
- Use a plain light background. Remove busy backgrounds, other people, and objects near the head.
- Do not wear a hat, cap, sunglasses, or heavy jewellery, and do not use filters or beauty modes.
- Keep a neutral expression and avoid a tilted head.
- For a signature, write on plain white paper, sign inside the frame, and keep the ink dark enough to survive compression.
- Crop with the guide on. Fixing a crop is far easier than redoing an application form.
- Download the processed file and confirm it opens correctly on your phone before you upload it.
Troubleshooting: why a photo is still rejected
- Wrong preset selected. When an exam publishes several sizes, pick the preset that names your exam, then confirm the numbers in the comparison table.
- File still too heavy after compression. Keep the required format, usually JPEG, and avoid a caption or heavy editing that adds weight.
- File too light. Enter the lower bound in the optional minimum size field so the tool stops compressing too far.
- Background not plain enough. Crop tighter so a plain wall fills the frame behind the head.
- Face too small or too large. Turn on the face mask guide and adjust the zoom until the head fills the guide.
- Old or blurred source image. No resizing tool can restore missing detail, so take a new photo with a phone camera.
- Wrong file name. If the exam defines a pattern, use the generated name from the file name card.
- Edited original. Filters and background removal can look unnatural to reviewers, so start from an unedited photo.
Privacy and limits
- The image is processed for your request so the tool can show the comparison and the download. No gallery of your photos is kept and no account is required.
- The specification values shown here are the values stored for UPPSC in the tool. If an official corrigendum changes a size, the tool value and this page must both be updated, and the official notification always wins over the tool.
- The tool resizes and compresses. It cannot improve a badly lit, blurred, or old photo.
- A JPEG cannot be restored to true photo quality after heavy compression onto a very small target size.
- Always verify the final file against the latest official notification before you submit the form.
Video tutorial
Exam specific reference from the official notification
The blocks below were already published on this page and are kept here word for word, so the notification details, document requirements, sample images, and official links stay available.
UPPSC Photo And Signature Resize Online
Resize your UPPSC photo to 5 cm x 6 cm and signature to 6 cm x 3 cm. The tool will resize them to the required 5 cm x 6 cm and 6 cm x 3 cm, 200 dpi, and in jpeg format for the UPPSC exam.
UPPSC 2025 Photo Size, Dimensions, and Format
UPPSC photo should be 5 cm x 6 cm, the resolution should be 200 dpi, the file size should be less than 50 KB, and it should be in jpeg format.
UPPSC 2025 Signature Size, Dimensions, and Format
UPPSC signature should be 6 cm x 3 cm, the resolution should be 200 dpi, the file size should be less than 50 KB, and it should be in jpeg format.
Final Size, Dimensions, and Format of UPPSC 2025 Photo and Signature
The final dimensions for the UPPSC photo and signature are 5 cm x 6 cm and 6 cm x 3 cm respectively, 200 dpi, and in jpeg format. After resizing your photo to 5 cm x 6 cm and signature to 6 cm x 3 cm, the images will be ready in the required format.
[After Photo and Signature resizing] Merge UPPSC Photo and Signature in One File
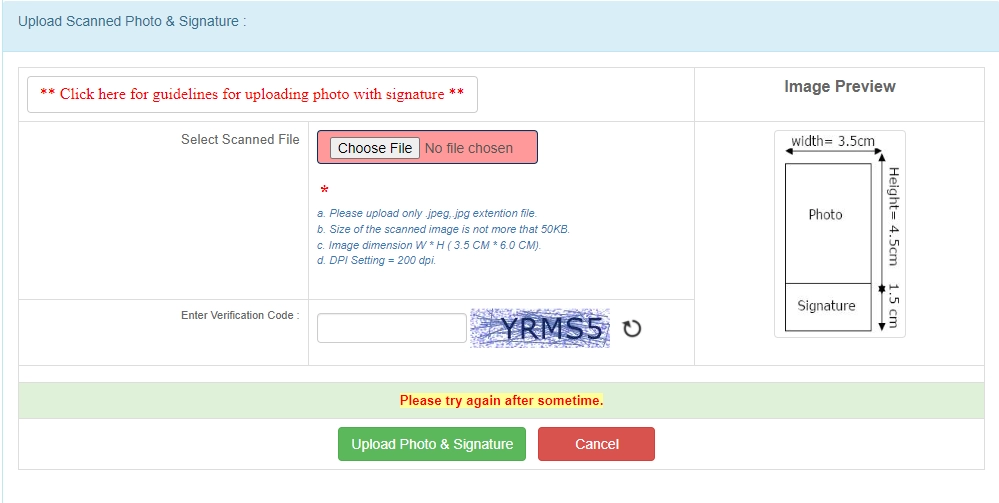
UPPSC Photo And Signature Size 2025
- UPPSC Photo dimensions are 5 x 6 cm, 200 dpi, less than 50 KB, and in jpeg format.
- UPPSC Signature dimensions are 6 x 3 cm, 200 dpi, less than 50 KB, and in jpeg format.
- UPPSC final Photo and Signature dimensions are 5 cm (width) x 6.0 cm (height), 200 dpi, and in jpeg format.

Error in UPPSC Photo and Signature Uploading
How to Upload Photo and Signature in UPPSC Form
Step 1: Resize your photo for UPPSC (5 cm x 6 cm) (Width X Height) here: https://newisty.com/uppsc-photo-and-signature-resizer-converter-and-compressor
Step 2: Resize your signature for UPPSC (6 cm x 3 cm) (Width X Height) here: https://newisty.com/uppsc-photo-and-signature-resizer-converter-and-compressor
Step 3: Your photo and signature are now ready for upload in the required dimensions, with proper resolution and size, without any errors.
Step: 4: Then Upload Merged Photo and Signature and Click Upload Photo and Signature button.
Guidelines for UPPSC Scanning Photograph with Signature
1. Paste the Photo on any white paper as per the required dimensions (5 cm x 6 cm). Sign in the signature space provided. Ensure that the signature is within the box.
2. Scan the required size containing the photograph and signature. Please do not scan the entire page.
3. The entire image dimension (5 cm x 6.0 cm) consisting of the photo along with the signature is required to be scanned and stored in (*.jpe, *.jpeg, *.jpg, *.png, *.tiff) format on your local machine.
4. Ensure that the size of the scanned image is not more than 50 KB.
5. If the file size is more than 50 KB, adjust the scanner settings such as DPI resolution, number of colors, etc., during the scanning process.
6. The applicant must sign in full within the box provided. Since the signature is proof of identity, it must be genuine and in full; initials are not sufficient. Signatures in capital letters are not permitted.
7. The signature must be signed only by the applicant, not by any other person.
8. The signature will be used on the Hall Ticket and wherever necessary. If the applicant's signature on the answer script does not match the signature on the Hall Ticket, the applicant will be disqualified.
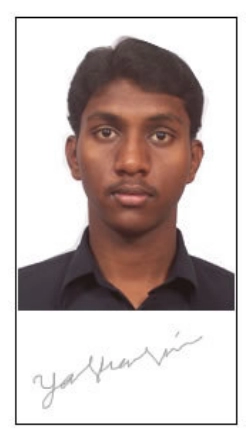
Example: The technical specifications of the sample scanned image shown above are:
• Size of the file < 50 KB
• DPI setting = 200 dpi
• True Color
Sample Image & Signature :-
Official links from the original page
Sample images from the original page
- UPPSC Photo dimensions are 5 x 6 cm, 200 dpi, less than 50 KB, and in jpeg format.
- UPPSC Signature dimensions are 6 x 3 cm, 200 dpi, less than 50 KB, and in jpeg format.
- UPPSC final Photo and Signature dimensions are 5 cm (width) x 6.0 cm (height), 200 dpi, and in jpeg format.
Frequently Asked Questions
FAQ
Comments (0)
Describe the issue you encountered so we can investigate and improve the tool.